Tuesday, 19 August 2014

Crochet Toe Guard Pattern for Roller Skates


A while ago - when I was still playing roller derby before I got pregnant - I made up some toe guards for my roller skates. I wanted to see if crocheted toe guards were feasible in terms of wear and tear before I wrote out a pattern for them. I had a few emails asking for a pattern and I am finally past the baby-brain phase and can write one out.
Below are some frequently asked questions I got about the toe guards. If you have any other questions, feel free to comment or email me and I will get back to you!
 
F.A.Q's

How long have your toe guards lasted?

I skated with my toe guards on for a good 4-6 months and they are still going strong. I found that they stretched a fair bit and got a bit discoloured and scuffed, but they still function perfectly well. These would be the perfect accessory for your boutfit*!

*boutfit - team outfit worn only for a bout and must be customized to match the theme

What surface do you skate on?

I skated on wooden/court surfaces - I can't say for sure how they would work on concrete.

Is this a one size fits all pattern?

I made these to fit my skates - Riedell She Devils, size 6.5 mens with a size 5 nylon plate. I assume that most skates are the same width around the toe though. I tried my toe guards on my skates as I went, to make sure the fit would be right, if your skates are a lot bigger it may just be a case of adding in an extra increasing round and adjusting where the holes where the laces and toe stop go. You do want a snug fit as it will stretch.

How do you put the toe stop back on without ruining the toe guard?

I decided to add an extra nut and washer to the toe stop so that I wasn't constantly screwing where the toe guard was. My new assembly went: Skate, nut, toe guard, washer, nut, toe stop. This isn't necessary but might stop the cotton being worn down as fast.

My work turned out different to yours, why?

First of all, I crochet super tight - sorry! I am also a bit of a make-it-up-as-I-go kinda crafter and this pattern might not be quite true to my work, but give it a go and challenge yourself! 

Crochet Toe Guard Pattern

*This pattern is free for personal use but I ask that you do not sell anything made from this pattern. I also ask that you link back to this page if you do put up any pictures of these or your own toe guards made from this pattern on the internet. Thanks!*

Materials:
3.5mm crochet hook (size 4 or E hook)
1 ball of 100% cotton yarn.
Roller skates to assure a good fit for the toe guard. 

Abbreviations:
ch - chain (pull yarn through)
sc - single crochet (hook through, pull yarn through, pull yarn through 2 loops)
sl st - slip stitch (hook through, pull yarn through 2 loops)

Row 1: Magic circle with 6 single crochet. Sl st to join.


Row 2: Ch 1, 2 sc in each stitch. Sl st to join.


Row 3: Ch 1, (2 sc in the next stitch, 1 sc in the next stitch). Repeat instructions in bracket around the circle. Sl st to join.


Row 4: Ch 1, (2 sc in the next stitch, 1 in the next, 1 in the next). Repeat instructions in brackets around the circle. Sl st to join.


 *This is where you would add another increasing round if you wanted a larger toe guard*

Row 5: Ch 1, sc in each stitch. Sl st to join.


Row 6: Ch 1, sc in each stitch. Sl st to join.


Row 7: Ch 1, sc in each stitch. Sl st to join.


Row 8: Ch 1, sc in each stitch. Sl st to join.


Row 9: *This round we add in the lace holes*  Ch 1, sc 12, ch 3 then sc in the next space. Sc 6, ch 3, sc in the next space. Sc until the end of the circle. Sl st to join.


Row 10: Ch 1, sc around, including the new stitches around the lace holes. Sl st to join.


Row 11: *This is where we add the toe stop hole. Use your pattern as a guide on your skates for where the toe stop hole should start* Sc around to where you want the hole. Ch 9, skip 3 stitches, sc into the next stitch.


Row 12: Sc around, including the ch 9.


Row 13: Sc around. Add in two lots of ch 3 for the second set of lace holes. Line these up with the first set. Once you sc past the toe stop hole, sl st and tie off. Weave in ends.

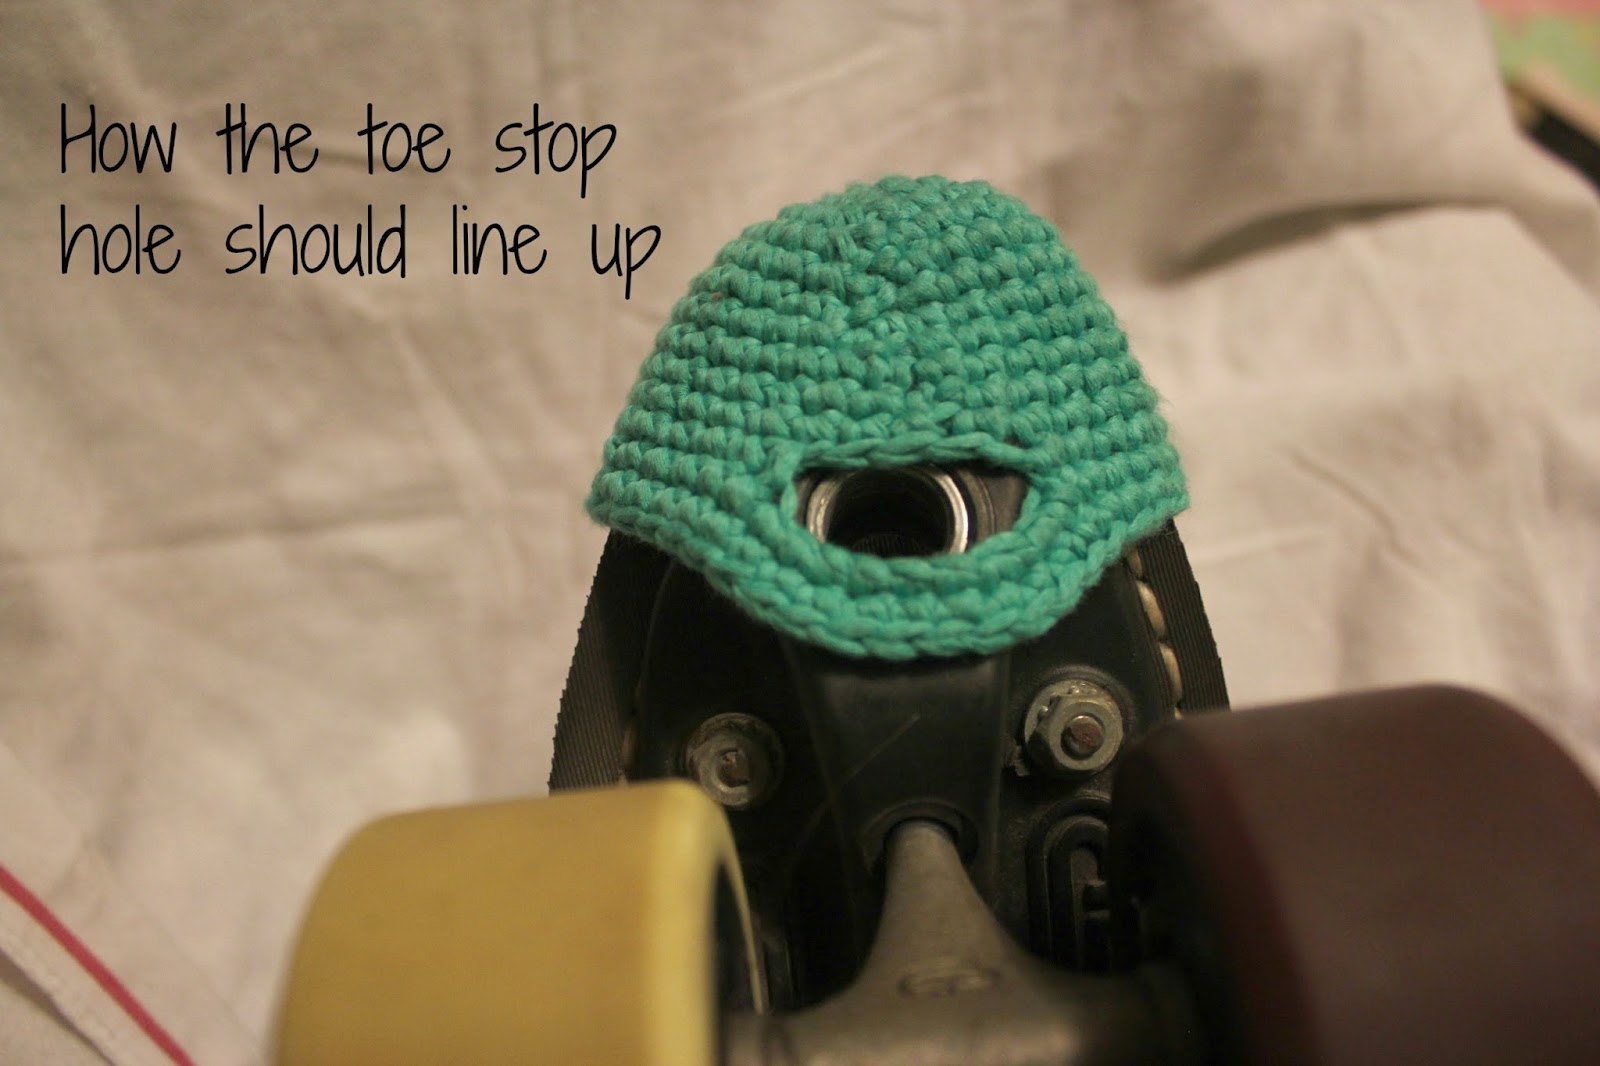
Nut, toe guard, washer, nut


Hope this helps - any questions just ask! I'd love to see a rainbow version!

Tuesday, 12 August 2014

Mama Made: Crossover Baby Hoodie


Pattern courtesy of Leafy Treetop Spot (free PDF download)

The other day I finally got round to sorting through and throwing out/giving away my old clothes. You know, the ones that you keep *just in case I fit it again* or *I'll definitely wear that again*. I figured enough was enough and ditched the clothes that didn't make the cut. There are some 'maybe's' though that lasted this round.

Anyway the point to that ramble was that in the midst of those clothes being re-homed, I found a pair of tracksuit pants that I had worn maybe once. The insides were still nice and fluffy and I had a thought that I could use the material from these pants to make a hoodie for Addison. Because do you see black hoodies for babies around anywhere?

I trawled the interwebs and found a free pattern for a hoodie I liked, then printed it out, and cut out my pieces. If I hadn't made a mistake and cut the wrong side of the hood a couple more times than necessary, then I would have had enough tracksuit fabric to make two hoodies. TWO! Baby clothes are so tiny and awesome.

The lining/ribbing I used is actually a t-shirt that has been cut up. Because can someone tell me where you can get awesome stretch fabric?

I followed the pattern and decided that I wanted my hood to be contrasting so I just flipped it inside out before attaching it to the jersey.


Because my model was sleeping while all this was taking place, I couldn't try the jersey on her for fit. The pattern is for 0-3 months and Addison is coming up 4 months but is pretty small for her size. Next time I make this I will try and alter the pattern to be slightly wider, longer in length and make the hood a bit deeper.

Other than that I am stoked at how well this turned out considering my (lack of) skills. I even managed to do relatively straight top stitching around all the seams.

And of course here are the obligatory cute shots of my darling girl - who is smiling for the camera for once!

It is getting harder and harder to photograph her these days - her limbs are constantly flailing all over the show!


Friday, 25 July 2014

Rainbow Chevron Quilt


A long, long time ago I started making this quilt. I had the pieces all cut and sewn into rows and for some reason it got shoved away and forgotten about. When I finally had the inspiration to dig it out I remembered why I got stuck.

Originally I had all the coloured rows separated by a strip of white. Now this quilt is made up of vintage sheets and pillowcases so I only had limited material to work with so the width of the quilt ended up being around about single bed size. With the white strips in between the rows, the length of the quilt top became a bit out of control and would probably only work for the worlds tallest basketball player. My intentions at the time were to somehow add a border and widen it a lot but I couldn't make myself do it.

Once I dragged it out again last month I decided to rip it apart and take out the white strips. This made the quilt so much more manageable and became a perfect single bed size. The white strips got sewn together and became the binding which I hand stitched onto the back. I used the leftover sheet material to make a slap dashed quilt back that was vaguely rainbow coloured. I bought some batting and quilted along the chevron lines.

The plan was to do a bunch more machine quilting but silly me didn't line up the points of the chevrons so it would have ended up all puckered and funny looking. Lesson learnt.

Now I have a pretty, bright coloured quilt to keep me warm over the rest of winter and hopefully it will become a special quilt for Addison when she is in a big girl bed in a year or so.


Thursday, 24 July 2014

Dear Addison - 3 Months


Addison my darling girl you are growing up right before our eyes! I must have mummy brain because those long nights when you were brand new seem so long ago. You are starting to really become your own person now. If I was to describe you in 3 words they would be: Cuddly, Chilled and Observant. For the most part anyway. I did just spend the entire afternoon trying to get you to take a nap.


You spend your days a lot more awake now and I am having to find lots of games to play and songs to sing. You like to lie back and sit up as long as we say 'Weeeeeeee', you lie under your play gym and try to grab the rings, you smile and almost laugh at fart noises and you get the most proud look on your face when you are 'on top of the mountain' (standing up on my bent knees).


You are not a fan of tummy time at all, we think it hurts your tummy and you have shown no interest in rolling. You have however, found your hands. They are in your mouth or trying to get to your mouth at every opportunity and you are starting to grab things.


We have had a breakthrough in your sleeping habits - long may it last! At bang on 11 weeks you slept through the night for the first time - 11pm-8am. Since then you have slept through almost every night aside from the odd few where you had a feed at 4 or 5am then straight back to sleep until 9ish. I am still just as tired though and I think I just have a lot of sleep to catch up with.


We have you sleeping in your bassinet in the lounge where the fire (or heatpump) keeps you warm but we are starting to think about moving you into your cot in your own room. It is first on the renovation list so hopefully we can get it done by the end of winter.


We have been going on a lot of walks lately with your friends from Plunket. We discovered that you like to be sitting up in the pram so you can see what is going on. You sit there just quietly looking around until you fall asleep.


I call your routine 'flexible'. Nights are generally the same but during the day and evening I find that I can get you to fit in with whatever plans without much drama. Thanks for making that part easy!

The best parts of my day are when I pick you up from your bed in the mornings and you give me the hugest smiles. I also love when your Daddy gets home and you treat him to lots of smiles and the beginnings of giggles when he makes monkey sounds.


You are beautiful and loved little one.

xx Mum and Dad

Thursday, 10 July 2014

Crochet Aviator Baby Beanie


My darling baby girl looks funny in most of her baby hats. I'm sure she actually looks fine and even adorable but I knew there must be a style out there that actually suited her and got that old-lady-stopping-to-coo treatment. It turns out the aviator beanie does the trick.

I did some stash-busting to make this beanie, using a couple of balls of cotton I bought in a sale sometime last year. I ended up making two beanies because my first attempt was way too big for Addison so that gets put away for a few months time.

Here are the obligatory cute photos and below is the pattern if you desire.


Pattern: (Adapted from Lisa Auch)

Supplies:

2x 50g balls of yarn in contrasting or complimentary colours. (I used cotton for my beanies but wool or acrylic would work just as well). This will be enough yarn to make 2 baby beanies in opposite colourways.

5.5mm Crochet hook

Tape measure

2 x coordinating buttons

Needle and thread to match the buttons.


Abbreviations: 

ch - chain
sc- single crochet
dc - double crochet
sl st - slip stitch
dec dc - decrease double crochet

Start with a Magic Ring with 12dc and sl st to join.

Row 2: chain 3, 2 dc in each st around, dc in slip stitch( ss), join. (24 sts)
Row 3: Chain 3, dc in same ch st,dc, continue  (2dc in same stitch , dc )11 times, dc in ss, join. (36 sts)
Row 4: Chain 3, dc in  same st, (2dc, dc in next 2 sts)11times, dc in ss, join. (48 sts)
(making this for a larger size just keep increasing at the crown until desired circumference is reached. )
Row 5: Chain 3, dc in next  8sts, (2dc, dc in next 7sts) 5 times, dc in ss, join. (54 sts)
Rows 6-10: chain 3, dc evenly around, join. (54 sts)
- See more at: http://www.crochet-patterns-free.com/2012/04/crochet-baby-hat-pattern-aviator-hat.html#sthash.tjnT2EHG.dpuf
Row 2: chain 3, 2 dc in each st around, dc in slip stitch( ss), join. (24 sts)
Row 3: Chain 3, dc in same ch st,dc, continue  (2dc in same stitch , dc )11 times, dc in ss, join. (36 sts)
Row 4: Chain 3, dc in  same st, (2dc, dc in next 2 sts)11times, dc in ss, join. (48 sts)
(making this for a larger size just keep increasing at the crown until desired circumference is reached. )
Row 5: Chain 3, dc in next  8sts, (2dc, dc in next 7sts) 5 times, dc in ss, join. (54 sts)
Rows 6-10: chain 3, dc evenly around, join. (54 sts)
- See more at: http://www.crochet-patterns-free.com/2012/04/crochet-baby-hat-pattern-aviator-hat.html#sthash.tjnT2EHG.dpuf
Row 2: Ch 3, then do 2 dc in each stitch. Dc in the stitch with the ch3 and join with a sl st.

Row 3: Ch 3 then dc in the same stitch. (Dc in the next stitch. 2 dc in the next stitch) repeat the instructions in brackets until you reach the end of the row. Sl st to join. (In my head I think 1, 2, 1, 2)

Row 4: Ch 3, dc in the same stitch. (Dc in the next 2 stitches then 2 dc in the next stitch) repeat the instructions in brackets until you reach the end of the row. Sl st to join. (In my head I think 1, 1, 2, 1, 1, 2)

At this point, grab a tape measure and measure around your baby's head (if possible). Otherwise use these measurements as a guide.

At birth Approx 34cm
3 mths Approx 40cm
6 mths Approx 44cm
9mths Approx 46cm

Stretch out your crochet circle and measure around that too, if it is pretty much the right size then great, if it is too small then do another row of increasing and measure again. The next increasing row will be 1, 1, 1, 2, 1, 1, 1, 2 or 3 lots of dc then 2 dc in one space and repeat.

Assuming your circumference is about right then:

Rows 5-11: Ch 3, dc in each stitch all the way around and sl st to join. Tie off.

Ear Flaps

Turn your beanie upside down and so the back seam (the sl st row) is facing you. From the sl st, count 10 spaces to the left and tie on.

Row 1: Ch 3, dc in the next 10 stitches, turn.

Row 2: Ch 2, dec dc over 2 stitches, dc in the next 6 stitches, dec dc over the next 2 stitches and turn.

Row 3: Ch 2, dec dc over 2 stitches, dc in the next 4 stitches, dec dc over the next 2 stitches and turn.

Row 4: Ch 2, dec dc over 2 stitches, dc in the next 2 stitches, dec dc over the next 2 stitches and turn.

Row 5: Ch 2, dec dc over 2 stitches, dec dc over 2 stitches and finish off.

For the other ear, count 20 stitches to the right and tie on. Repeat instructions for Rows 1-5.

Change yarn colour.

Tie on with new yarn colour on the front side of the right ear flap. Sc in each space until you have gone all the way around the beanie. Sl st to join, turn.

Front Flap
 

Sc across the front of the beanie until you hit the beginning of the other ear flap. Turn.
Sc back across, turn.
Repeat until you have 8 rows of sc and finish off.

Flip up the front flap and sew on the two buttons, one on each side, securing the flap in place.

To make the ties that hang from the ear flaps:

Cut 4 strips of base yarn and 2 strips of contrasting yarn about 10cm long. Tie a knot at the top and plait the strips together (double strength). Tie onto the bottom stitch of the ear flaps with a knot. Trim the ends.

Repeat for the other side. 

 Hopefully you now have a completed beanie and it looks how it is supposed to!

If you find any issues with the pattern, then let me know or follow the link at the top to find the original pattern.


Row 2: chain 3, 2 dc in each st around, dc in slip stitch( ss), join. (24 sts)
Row 3: Chain 3, dc in same ch st,dc, continue  (2dc in same stitch , dc )11 times, dc in ss, join. (36 sts)
Row 4: Chain 3, dc in  same st, (2dc, dc in next 2 sts)11times, dc in ss, join. (48 sts)
(making this for a larger size just keep increasing at the crown until desired circumference is reached. )
Row 5: Chain 3, dc in next  8sts, (2dc, dc in next 7sts) 5 times, dc in ss, join. (54 sts)
Rows 6-10: chain 3, dc evenly around, join. (54 sts)
- See more at: http://www.crochet-patterns-free.com/2012/04/crochet-baby-hat-pattern-aviator-hat.html#sthash.tjnT2EHG.dpuf

Monday, 30 June 2014

Cloud Felt Mobile


Somehow I have gathered a bunch of felt in my stash and I figured I could make some simple, baby type crafts.

I remember seeing a cloud mobile somewhere in a magazine and a quick Pinterest search helped get the creative juices flowing.


I used white felt for the cloud (obviously), and then made 5 raindrops in the colours I had spare and arranged them in a semi-rainbow-type sequence.

To hang the raindrops from the cloud I just crocheted a chain of varying lengths, as well as one chain to hang from the top.

The mobile is 3D and the cloud and raindrops are filled with polyfill.

I machine stitched around all edges but to be honest, I like hand stitching on felt a lot nicer so next time I will hand stitch them.


Addison loves her cloud mobile which I have hung on the wall next to the change table. Every time she gets changed she looks over and gives it big smiles. I give it a gentle swing too so it is more interesting for her to look at. 

Tuesday, 24 June 2014

Lately


Lately we have been:

  • Walking in parks
  • Making new friends at Plunket group
  • Trying to unblock a tiny nose
  • Getting Addison dedicated
  • Having playdates
  • Learning to use my fancy new camera (Thanks Dave!)
  • Sleeping for 5 hours at night! (occasionally)