Showing posts with label Tutorial. Show all posts

Tuesday, 18 March 2014

DIY Neck and Shoulder Wheat Pack


I own a bunch of wheat packs, most courtesy of Holly over at Hollymayb. When she did a giant stash clean out, I walked away with some nice heavy drill cotton and a bag full of wheat (among many other things!).
The other night I decided that having a wheat pack that I could put around my neck and have it stay there would be pretty awesome. So off I went and after an evening sitting at the sewing machine, I put this sucker in the microwave and ended the night in bliss.

Luckily I remembered to take progress shots for this tutorial but I winged this pattern so sorry for the inconsistancies!

 You will need:
  • 2x pieces of A4 paper taped together down the long sides.
  • Piece of drill cotton or heavy fabric approx 50cm x 60 cm
  • 550g Wheat (available from bulk bin stores such as Bin Inn)
  • Scissors
  • Sewing Machine with co-ordinating thread
  • Sewing Pins
  • Funnel or Rolled up paper to make a funnel.
I made the pattern up by wrapping the paper around my neck and cutting and changing it until it felt right, hence the wacky measurements. I also folded it in half widthwise to get it symmetrical.

Hopefully the pictures say more than my ramblings but if you have any questions, please ask!


If you make one of these, leave a link in the comments to a picture of it, I would love to see!

Monday, 1 April 2013

{Tutorial} Quilted Laptop Case


 Need a pretty yet funtional laptop case that will protect it from scratches and knocks from textbooks? This quilted laptop case fits the bill. made with lightweight batting it is not too bulky but gives a nice amount of padding to keep your precious laptop safe.

You will need: 
  • Approx 1m* facric (non-stretch) for outside of case
  • Approx 1m* contrasting fabric for lining
  • Approx 1m* thin quilt batting/wadding
  • 2m Bias Binding in matching or contrasting colour
  • 2x large buttons
  • Matching thread
  • Sewing machine
  • Sewing needle

*This laptop case was made for a 13" Macbook Pro. It used around 75cm of each fabric.

Step 1
Lie out your main fabric and put the laptop on top. You want enough fabric to be able to fold completely over it from top and bottom. Leave at least 20cm on each side. Cut to size.


Step 2
Cut the lining and batting out the same size as the main fabric.


Step 3
Lie the 3 pieces of fabric together, right sides facing out and pin along one side. When this gets quilted the layers might shift off-centre. This is why we allow a large seam allowance.


Step 4
Quilt the 3 layers together. Hold the layers tight as you sew to prevent puckering. Feel free to quilt whichever way you like, straight lines, wavy lines or patterns.

Front side quilted
Lining side quilted
Step 5
With lining side facing out, fold up the new quilted fabric to cover the laptop. Pin along the sides of
the laptop. Make sure the laptop fits in quite tight to prevent it from sliding around the finished case.


Step 6
Sew up the pinned sides of the laptop. Make sure you remove the laptop before you do this!
 

Step 7
Trim close to the edges up the sides of the case, including the top flap.


Step 8
Overlock the sewn edge. If you do not have an overlocker then just use a medium zig-zag stitch on your sewing machine.


Step 8
Flip the laptop case right way out and push out corners.


Step 9
Cut a length of bias binding about 5cm longer than your front edge. Pin along the edge and fold edges over so they look neat and tidy.


Step 10
Sew the bias binding on to the front edge.


Step 11
Trim the corners of the flap into curves. Or leave square if desired.


Step 12
Pin the remaining bias binding around the edge of the flap of the case. Fold over the ends to make a neat edge and sew along. Trim off any thread ends.


Step 13
If your sewing machine has a buttonhole setting, let it do its thing, if not:
 
Cut a slit for a buttonhole through all three layers of fabric near each curve on the top flap.


Step 14
Hand stitch around the edge of each buttonhole. 


Step 15
With the flap closed, find the point which the buttons will fit through the button hole. Open the flap and sew each button onto the bottom part of the case.


Step 16
Finished! Make sure all stray threads are trimmed and button holes fit the buttons.


I hope this tutorial has been helpful. If you have any questions or trouble following it, just ask a question in the comment section below and I will do my best to help!

This pattern is free to use but if you make one, please link back here.

Happy quilting!

Tuesday, 5 February 2013

Cow Print Footstool - Re-Upholstered


Last weekends project was to finally re-cover this footstool. It had been waiting for some fabric because the stuff I was going to use was too short.
I finally made it to Kutwell Fabrics and hunted for suitable fabric, and nothing caught my eye. Then all of a sudden I saw this cow print fabric and had a revelation. I could cover the stool in this fabric* and give it to two of my amazing friends!

* The cow print refers to their last name (Mutu) which they lovingly refer to as moo2. Baby moo2 has a very awesome cow onesie and a cow print cup so I was just going with the trend..)

As I was buying the fabric I realised that it was quite thin and a bit see-through so I decided to grab some calico to put underneath. Kutwell is a seriously amazing bargain fabric store, they have the basics (calico, batting, zips etc) for super cheap and although their fabric selection may not be 'on trend' they still have a wide range of fabrics.

Anyway the point of that promo was to say that the total price for 1.5m calico and 1.5m cow print was $7. What the!

The Re-Upholstry Run Down

Like usual, the first step was to remove the black fabric underneath the footstool with a pointy tool to remove the staples. I use the flat head screwdriver attachment on my multi-tool.

The next step was removing more staples that held on the fabric.

Once the staples were pulled, the fabric was removed to reveal the bare-bones footstool.


I sanded the chipped varnish off the legs of the stool at this point.

I unpicked the fabric I had just removed and used that as the pattern for my new calico and cow print layers.

Following the same seam lines that were on the original fabric, I sewed down each corner of the calico fabric and tried it on the stool. Each corner sat well so I went ahead and pulled it tight and stapled it on.


I followed  the same process with the cow print fabric but when I tried it on the stool, one of the corners was a bit too tight so I had to unpick and sew the seam a bit smaller. 

I stapled down the cow fabric carefully then stapled a new piece of leftover calico underneath because the old black piece was getting a bit ratty.


I am really amped about how this footstool turned out! It was way out of my comfort zone using fabric like this but I really love how funky it looks.


I hope the Moo2's are enjoying their footstool and get a smile on their face when they put their feet up!

Also dont forget to enter my GIVEAWAY on my last post!

Wednesday, 16 January 2013

Tutorial: How to paint on Burlap


I have been seeing a lot of burlap material around on Pinterest lately and I have acquired some from an op shop. I am on the hunt for great and amazing things to do with it but for now I thought I would show you how easy it is to paint an image onto your material to jazz it up a little.

  • Piece of burlap fabric
  • Stencil to fit onto fabric
  • Newspaper for protecting surfaces
  • A paintbrush
  • Textile paint (If you wont be washing your fabric then normal acrylic paint will do just fine)


Step 1: Lay out your newspaper and place the burlap on top. Choose whichever side you would like to have the image on as they look slightly different. 


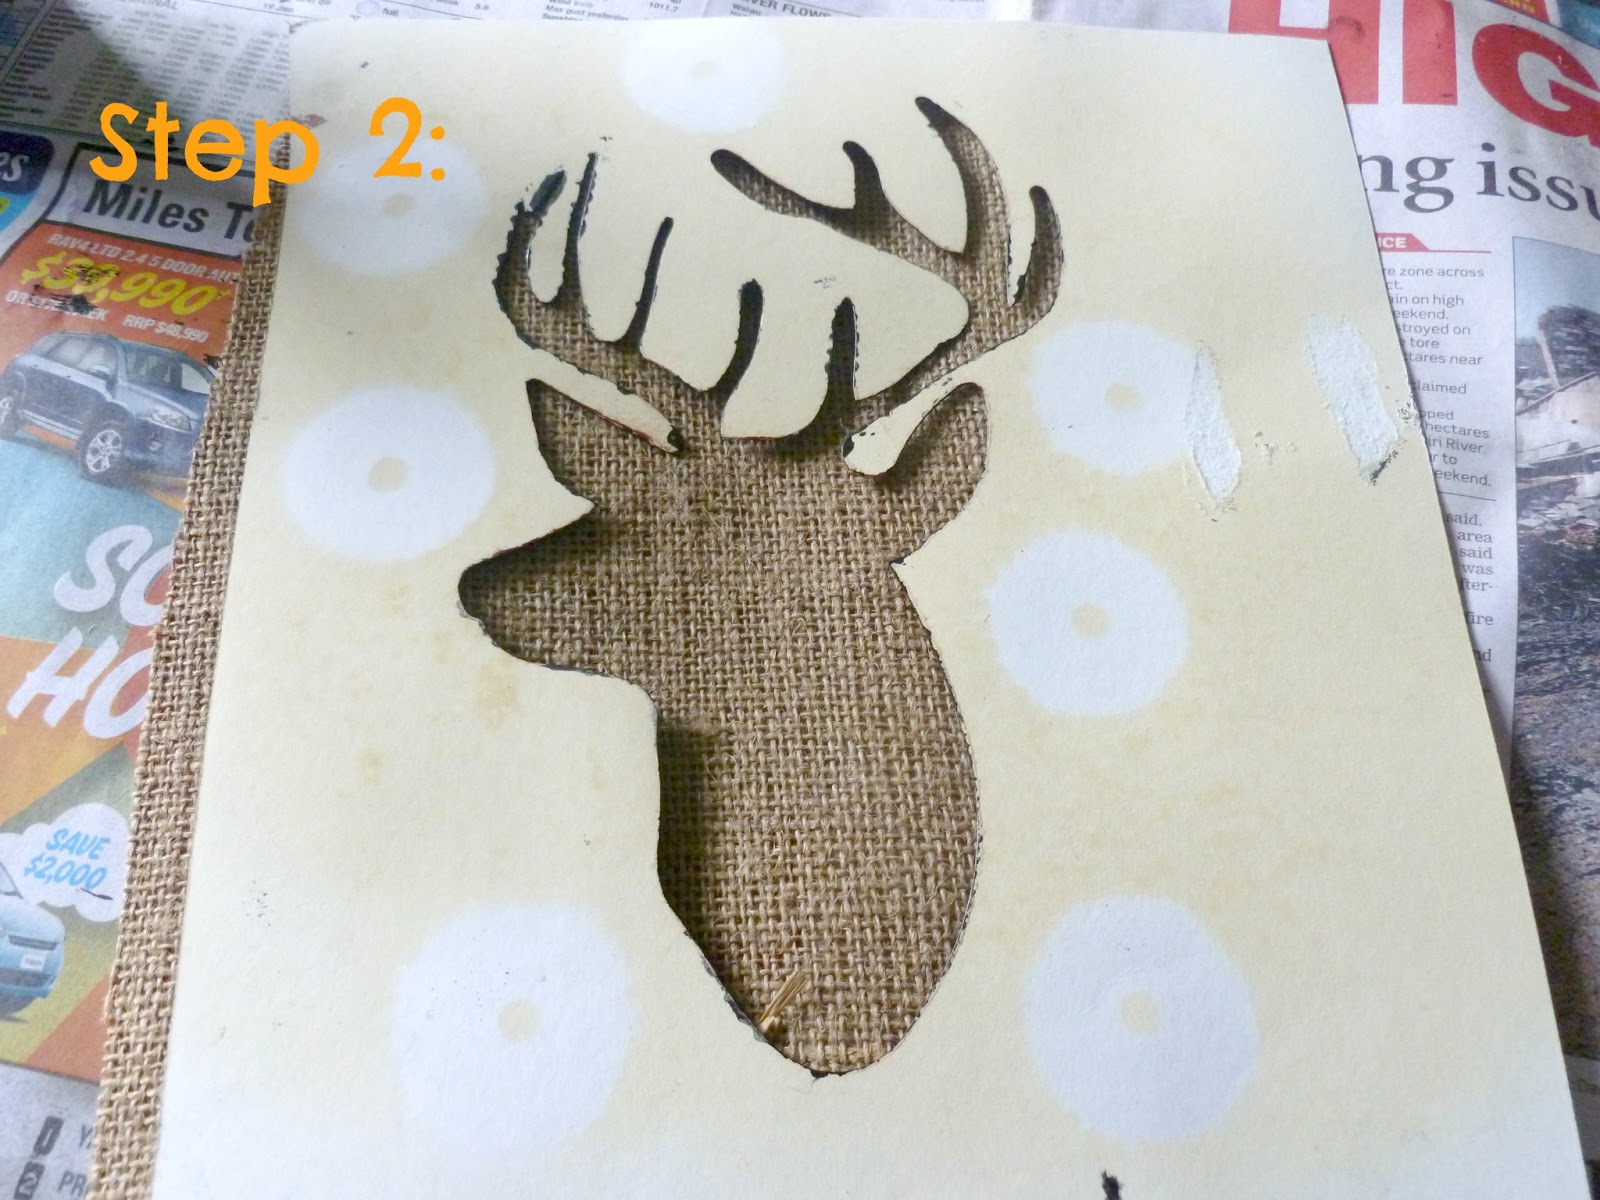
Step 2: Place the stencil onto the burlap. Make sure it is centered (if that is what you're going for).


 Step 3: Dip your paintbrush into the paint but try not to get a huge blob. You want the paint to be applied evenly. 


Step 4: Hold down the edges of the stencil as you paint over it. This will help stop paint from bleeding through.


Step 5: Finish painting inside the stencil. It doesn't matter if you get paint on the outside of the cardboard.


Step 6: Carefully remove the stencil like you would remove a band-aid. This will stop any excess paint hiding underneath the stencil from making patches that shouldn't be there.


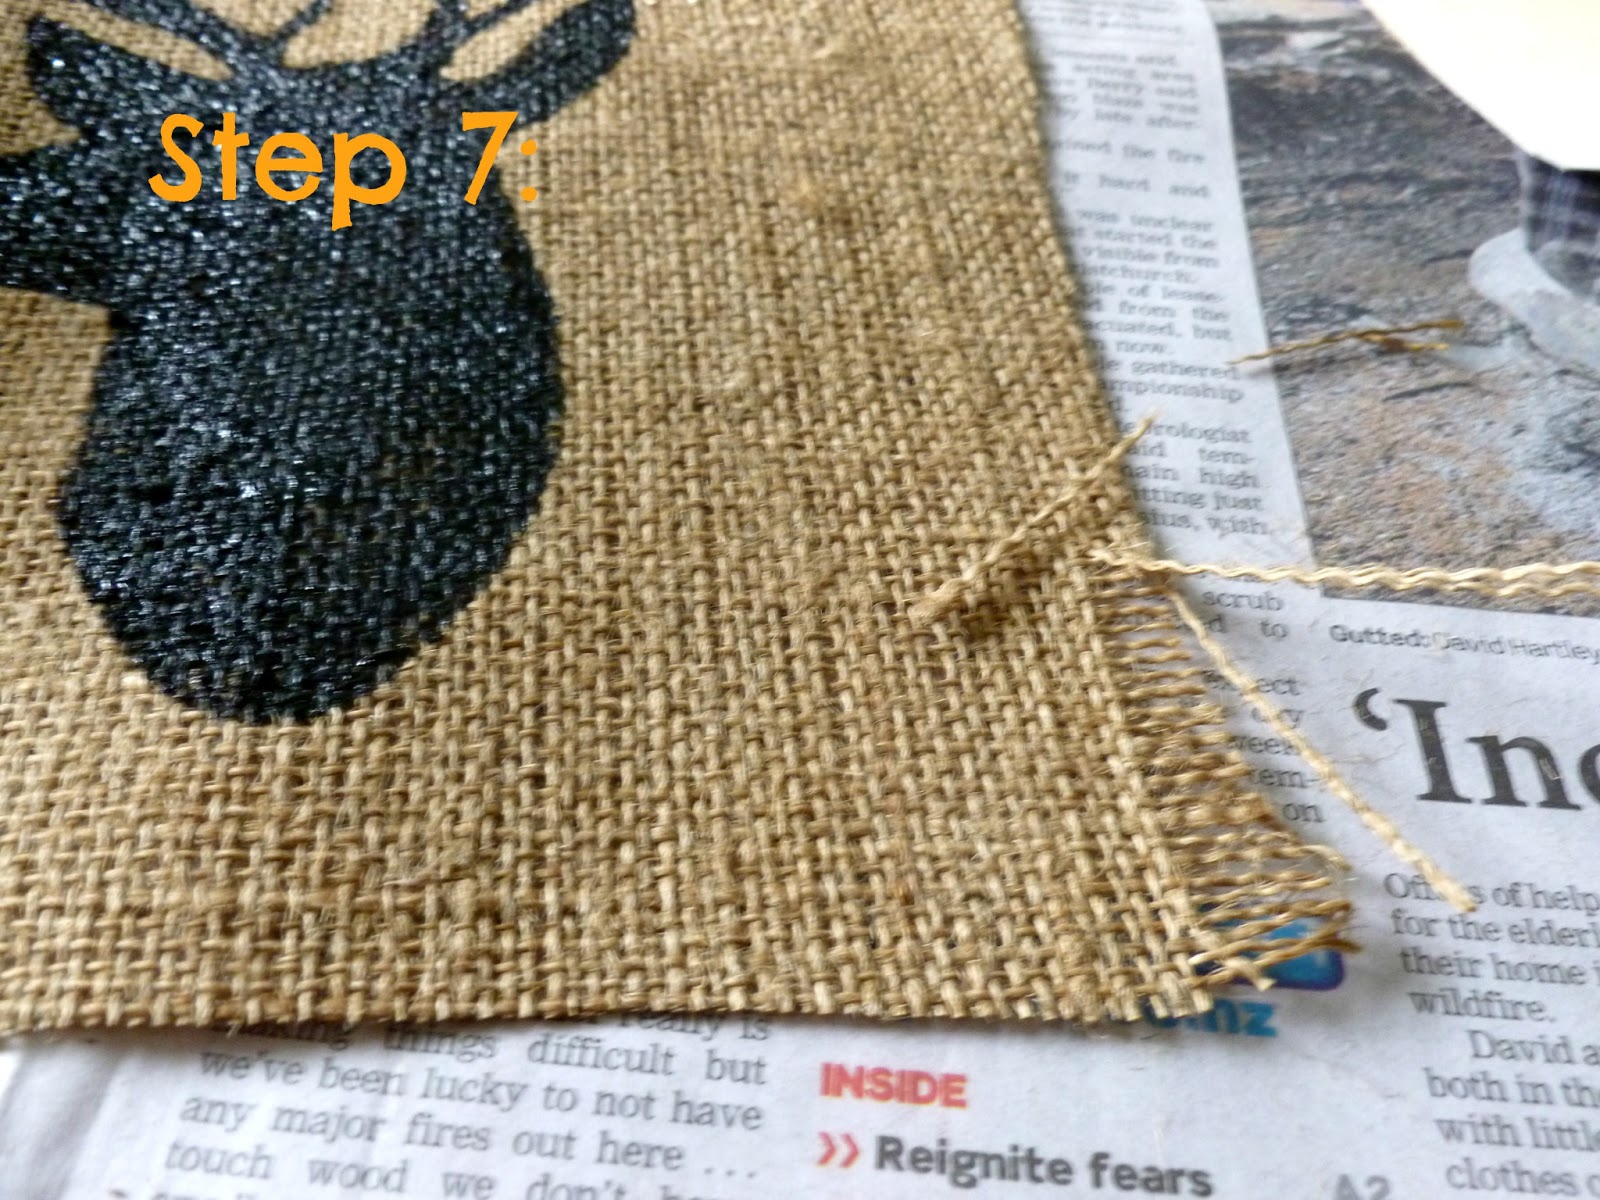
Step 7: If you choose, fray the edges by pulling off the strands of material closest to each edge until the desired look is achieved. 


Step 8: Admire up close.


Step 9: Step back and admire your work. 

Additional tips:
  • If you will be washing your fabric, follow the instructions on the textile paint and and iron to seal.
  • If you are doing an intricate stencil, practice on a sheet of computer paper first to get used to how the paint spreads.
  • You do not need to use a stencil, you can freehand paint a design but I find it harder to get clean, crisp edges that way.

I hope this helps, and feel free to ask me any questions. Happy painting!