Wednesday, 30 January 2013

Our *temporary* Home {Kitchen}


Showcasing my temporary home to inspire others and prove that organised clutter can look good!

Today I shall show you the last of this series, the Kitchen. I really enjoy this space and wish we utilised the dining area more.

We are pretty blessed to have such a big area to work with in our rental, in our house hunting experience we have seen nothing like this. (Probably doesnt help that we are looking at cheaper than cheap places haha)

Anyway after a few re-arrangements we have settled on a system that works for us.


The Dining Area.

I love the Warehouse rug we bought a few years ago, still going strong. Over the back you can see This dresser on the right and This hutch on the left. The hutch we are using as a tea area with the jug and beverage items all in one spot.


Behind the dining table is an old fireplace that we can't use any more *sigh* (earthquakes).
However the mantle is a great decorating space and I have cluttered it up with photos, candles, bunting and a mirror. Underneath the mantle is the top part of another hutch which has a few other display items in it. The bottom of the hutch is our extra bench space which I will show you in a sec.


I like using all the wall space and my favourite recipes have been an attempt at art as well as a few other bits and bobs. 


This blackboard is awesome! We don't use it enough. Every so often I will get organised and use it as a meal planner but I forget and the same meals stay up there for weeks! 

My arty friend did a wee portrait of Killer and I rekon its pretty cute. 


The Kitchen

As you can see, we have turned the bottom half of a hutch into some extra bench space and it corners off the kitchen a bit. I enjoy this kitchen, although I would change the bench top surface. I keep staining it with food colouring eek!


My kitchen mixer has pride of place and the utensil holder is working well.


Pros: large space, plenty of room to move, functional

Cons: freezing in winter and isolated from lounge.

As we are lounge people, I would love to have a bit more open plan living going on. When I am in the kitchen I would like to feel included in goings on rather than having to keep darting back and forward. 

I hope you have enjoyed the different areas of the rental we try to make homely. 
If you missed any here are the links to the other rooms:


Monday, 28 January 2013

Our *temporary* Home {Bedroom}

Showcasing my temporary home to inspire others and prove that organised clutter can look good!

Today I give you a look into our bedroom. Lately I have been working hard to make the room feel bigger and lighter and have been able to reduce how much 'stuff' is on display.


Looking at this picture I realise the room needs a lampshade! I think when we moved in it had one of those white paper lantern type things but that isn't our style.

Our bed was a Trademe purchase, one of the first things we bought when we got married. It stretched the tight funds at the time but for $240 how could we resist this beautiful bed!

The colour of the room has definitely grown on me, a sort of duck-egg blue.


We have recently just painted our entire bedroom furniture white and it has made a massive difference at brightening up the room! I also rearranged my drawers so that the top drawer contains all the stuff that used to clutter the top of the dresser. So now there is a photo, my hairbrush and my perfume collection on top and no hair clips or ties in sight!


This wee lead light window is a cool feature in our room, although if I had a say, I would put a blind up.


We are fortunate to have a huge wardrobe in our room although it also doubles as a linen/storage closet too as there is nowhere else. If you look to the left you can see our Christmas tree trying to make an escape.

Our suitcases get stored on top of the wardrobe and create an interesting feature.

Is your bedroom a relaxing place to be? What have you done to make it that way?

Saturday, 26 January 2013

Our *temporary* Home {Hallway}

Showcasing my temporary home to inspire others and prove that organised clutter can look good!

Todays showcase is the hallway/entrance way.

Probably the most boring of the four rooms I will be showing you, but there are some items I would love for you to see.


The wooden panelling in this house is a really beautiful feature. The hallway is the only place it shows up though. Notice the photo frame collection going on up top? What else are you supposed to do with a ledge that high!


On one wall I have a map of Canada on a metal tray, a mirror made from gross plastic that I disguised with white paint, and a coffee-splattered christmas decoration made from sheet music. It was too pretty to hide away for another year!


On the wall opposite the front door hangs this beauty. I bought a set of two of these mirrors from Trademe three years ago for $70. I remember being pretty new to Christchurch and driving all the way to Lyttleton to collect them.

What I like most about mirrors is the way that a reflective surface brightens up the darkest of spaces. 


Looking slightly worse for wear (or is it supposed to look like that??) a bathroom sign made from thin gauge copper. I engraved it with a ball point pen!

I like identifying the bathroom because it eliminates the awkward 'Is this the bathroom...  nope someones room' dash from a busting house guest.


This table I picked up from a garage sale a while back but it has no glass for the top. This limits the things that will fit on the top but I managed to balance these two framed maps on it.

Each map shows the place Dave and I grew up. Daves has Timaru and mine has Tauranga and surrounding areas.

The polaroid photo underneath is of us and a previous flatmate playing in the snow on one of the snow days of 2011.

So there you have it. The view from the front door!

What sort of items do you have in your entraceway? Are they functional or decorative? Or both!

Wednesday, 23 January 2013

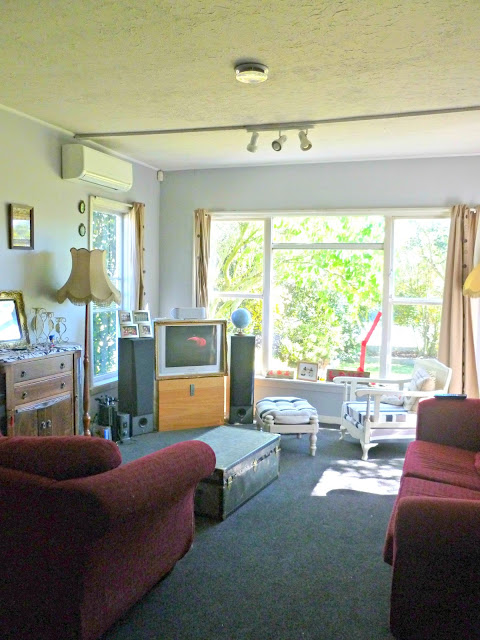
Our *temporary* Home {Lounge}

These past few months Dave and I have been working really hard to de-clutter our possessions. We are hoarders by nature but our collecting was starting to get out of control and making us feel like our *temporary* house was not our Home. (We are currently renting)

Our first couple of years of marriage were spent slowly buying and making items that fit with our style and taste and will hopefully last the test of time. It finally feels like we have reached the end of the major items and we have settled into a comfortable state of ahhh this is home.

This mini blog series is my attempt at showcasing the de-cluttered rooms of our home and hopefully inspiring you to see that minimalism doesn't have to be for everyone and clutter, when cleverly disguised, can look good!

Today, we start with the lounge:

Our lounge is crazy huge, it took us a while to figure out how to best utilise the space. Once summer arrived and the french doors had been fixed (earthquake), we re-arranged the lounge to accommodate them. 


One of the first things people usually comment on is the frame around the TV. We bought it as a wedding prop for photos and it just happens to fit our 32" clunker of a television.

Dave made the wooden chest under the TV in high school. The globe was one of those 'mistake bargains' where the shopkeeper gets the price wrong and is then obligated to give it to you for that price. $12 thank you very much.

We are borrowing this old oak unit from our landlord (read: left it in our garage)
I have a few of these old wooden standard lamps, ready and waiting for a makeover.


This chest was an old suitcase of a man (Mr McCallion we presume) who worked on a ship based in Lyttleton. It serves a double purpose as our getaway chest (tent, sleeping bags, camping stove etc) and out coffee table.
This was purchased for $60 from Salvation Army Woolston (no longer in existance)

The lounge is the current resting place for my bike. It is quick and easy to grab it and go bright and early in the morning. Plus it makes an interesting statement I think.

My 'sewing room' is also in the lounge, tucked away in the corner and I have tried to hide away all the fabric, wool, batting, and general items but it is probably not going to stay that way for long.


I hope you have enjoyed the tour of our lounge. I am stoked at the way it is looking and it feels like a really enjoyable space to relax and create in.

Maybe we can have you around someday?

Sunday, 20 January 2013

Killer - The Cat Behind the Blogger


If you have been reading my blog for a while now, you may have noticed a feline face popping into the photographs every now and then.
Since she hasn't been formally introduced, I thought I would dedicate a post to my cat.

Name: Killer
Birthday: 14th Feb 2008 (Valentines Day!)
Sex: Female
Type: Domestic Short-haired Tabby

Killer was born in a far off town called Omarama, NZ. She was a surprise gift from Dave, 6 months into our relationship. We were in Timaru for a friends wedding and Dave decided to drive back through the middle of the South Island to visit some friends. I thought nothing of this detour and was unaware until we were at a cafe and the waitress said 'So you guys are the ones getting one of the kittens?' Dave looked at the waitress in horror, realising the surprise was blown and my eyes went wide and asked 'Dave, am I getting a kitten?' Dave looked pretty dejected and grudgingly said that it was suposed to be a surprise.
Well it was still a surprise to me and we drove over to the house where the kittens were. I got to pick which one I wanted and to be honest, none stood out to me but I chose the one showing me the most interest.
She was packed into a box lined with my jersey (which got peed on then thrown out) and we took the tiny 6-week old kitten on a 5 hour drive to Invercargill. That wasn't a very pleasant trip with all the pitiful mewing that she was doing but eventually she went to sleep.

The name came about when we decided to call her something (obviously). I was calling her Zoe but we were still playing around with names. We were running through the silliest names we could give her when all of a sudden I said 'what about Killer?'
Dave burst out laughing then agreed that it would be a hilarious name for a cat and Killer had a name.

In Invercargill, Dave and I lived in seperate flats before we got married, and as per student life, we shifted around a lot. Killer flicked in between Dave and I a few times because of tenant rules etc so Killer is used to moving house. This is super handy because we don't have to worry about her running away. She knows that wherever we are, that is her home.

Killer is a curious cat. This has really been her downfall. In our first flat in Christchurch, Killer was hit by a car. That resulted in one very scared Amy. She was alive but in a tonne of pain and she was limping. She went off to the vet and the vet said that her legs would heal and there was no major damage to internal organs but she had a paralysed tail.

It was going to cost a horrendous amount to get her tail amputated and it still had blood flow so we have so far seen no need. So when you meet Killer she will have a floppy tail that serves no purpose. She doesn't seem bothered and it doesn't affect her balance or climbing or bird-catching ability.

She also has a very unique personality. She is very social and talkative, she loves to be around people and follows me like a shadow. However she does not like babies who can crawl or walk. Or vaccuum cleaners.

Here are some photos of her, most of which she has sneaked in (blog posts).


Playing with the loose ends


The last photo of her with a working tail


Hiding in my scraps


As close to dressing her up as I will ever get. (not that I'm one of THOSE people)


Thursday, 17 January 2013

Cane Chair Restoration and Re-style


Thanks to some great friends who are always on the lookout for roadside treasures for me, I scored this classic cane chair for free!

The cane on the arms had holes in it so instead of trying to repair it, I decided that it should go. The only problem was that the stubs of leftover cane were sharp and scratchy.

The solution Dave came up with was to arm me with a brutal wire brush attachment on a drill and let me loose grinding the stubs down. It worked!

I then had to sand and sand and sand then paint coat after coat after coat then sand again and BEHOLD! One beautifully restored chair.

Don't look too closely at the piping on the cushion, it was my first time making my own and its a wee bit wonky. Other than that, I think it turned out rather well! It also just happens that the foot stool I re-upholstered back in August fits in well to create a rather relaxed chair destined for a sunny spot in the lounge.

P.s I have been riding my bicycle to and from work every day this week, it just so happened to be the wettest week in summer which put a bit of a dampener on things (get it!). But so far, so good and I am enjoying getting some fresh air.

xx Amy

Wednesday, 16 January 2013

Tutorial: How to paint on Burlap


I have been seeing a lot of burlap material around on Pinterest lately and I have acquired some from an op shop. I am on the hunt for great and amazing things to do with it but for now I thought I would show you how easy it is to paint an image onto your material to jazz it up a little.

  • Piece of burlap fabric
  • Stencil to fit onto fabric
  • Newspaper for protecting surfaces
  • A paintbrush
  • Textile paint (If you wont be washing your fabric then normal acrylic paint will do just fine)


Step 1: Lay out your newspaper and place the burlap on top. Choose whichever side you would like to have the image on as they look slightly different. 


Step 2: Place the stencil onto the burlap. Make sure it is centered (if that is what you're going for).


 Step 3: Dip your paintbrush into the paint but try not to get a huge blob. You want the paint to be applied evenly. 


Step 4: Hold down the edges of the stencil as you paint over it. This will help stop paint from bleeding through.


Step 5: Finish painting inside the stencil. It doesn't matter if you get paint on the outside of the cardboard.


Step 6: Carefully remove the stencil like you would remove a band-aid. This will stop any excess paint hiding underneath the stencil from making patches that shouldn't be there.


Step 7: If you choose, fray the edges by pulling off the strands of material closest to each edge until the desired look is achieved. 


Step 8: Admire up close.


Step 9: Step back and admire your work. 

Additional tips:
  • If you will be washing your fabric, follow the instructions on the textile paint and and iron to seal.
  • If you are doing an intricate stencil, practice on a sheet of computer paper first to get used to how the paint spreads.
  • You do not need to use a stencil, you can freehand paint a design but I find it harder to get clean, crisp edges that way.

I hope this helps, and feel free to ask me any questions. Happy painting!