

A while ago - when I was still playing roller derby before I got pregnant - I made up some toe guards for my roller skates. I wanted to see if crocheted toe guards were feasible in terms of wear and tear before I wrote out a pattern for them. I had a few emails asking for a pattern and I am finally past the baby-brain phase and can write one out.
Below are some frequently asked questions I got about the toe guards. If you have any other questions, feel free to comment or email me and I will get back to you!
F.A.Q's
How long have your toe guards lasted?
I skated with my toe guards on for a good 4-6 months and they are still going strong. I found that they stretched a fair bit and got a bit discoloured and scuffed, but they still function perfectly well. These would be the perfect accessory for your boutfit*!
*boutfit - team outfit worn only for a bout and must be customized to match the theme
What surface do you skate on?
I skated on wooden/court surfaces - I can't say for sure how they would work on concrete.
Is this a one size fits all pattern?
I made these to fit my skates - Riedell She Devils, size 6.5 mens with a size 5 nylon plate. I assume that most skates are the same width around the toe though. I tried my toe guards on my skates as I went, to make sure the fit would be right, if your skates are a lot bigger it may just be a case of adding in an extra increasing round and adjusting where the holes where the laces and toe stop go. You do want a snug fit as it will stretch.
How do you put the toe stop back on without ruining the toe guard?
I decided to add an extra nut and washer to the toe stop so that I wasn't constantly screwing where the toe guard was. My new assembly went: Skate, nut, toe guard, washer, nut, toe stop. This isn't necessary but might stop the cotton being worn down as fast.
My work turned out different to yours, why?
First of all, I crochet super tight - sorry! I am also a bit of a make-it-up-as-I-go kinda crafter and this pattern might not be quite true to my work, but give it a go and challenge yourself!
Crochet Toe Guard Pattern
*This pattern is free for personal use but I ask that you do not sell anything made from this pattern. I also ask that you link back to this page if you do put up any pictures of these or your own toe guards made from this pattern on the internet. Thanks!*
Materials:
3.5mm crochet hook (size 4 or E hook)
1 ball of 100% cotton yarn.
Roller skates to assure a good fit for the toe guard.
Abbreviations:
ch - chain (pull yarn through)
sc - single crochet (hook through, pull yarn through, pull yarn through 2 loops)
sl st - slip stitch (hook through, pull yarn through 2 loops)
Row 1: Magic circle with 6 single crochet. Sl st to join.


Row 2: Ch 1, 2 sc in each stitch. Sl st to join.

Row 3: Ch 1, (2 sc in the next stitch, 1 sc in the next stitch). Repeat instructions in bracket around the circle. Sl st to join.

Row 4: Ch 1, (2 sc in the next stitch, 1 in the next, 1 in the next). Repeat instructions in brackets around the circle. Sl st to join.

*This is where you would add another increasing round if you wanted a larger toe guard*
Row 5: Ch 1, sc in each stitch. Sl st to join.

Row 6: Ch 1, sc in each stitch. Sl st to join.

Row 7: Ch 1, sc in each stitch. Sl st to join.

Row 8: Ch 1, sc in each stitch. Sl st to join.

Row 9: *This round we add in the lace holes* Ch 1, sc 12, ch 3 then sc in the next space. Sc 6, ch 3, sc in the next space. Sc until the end of the circle. Sl st to join.

Row 10: Ch 1, sc around, including the new stitches around the lace holes. Sl st to join.

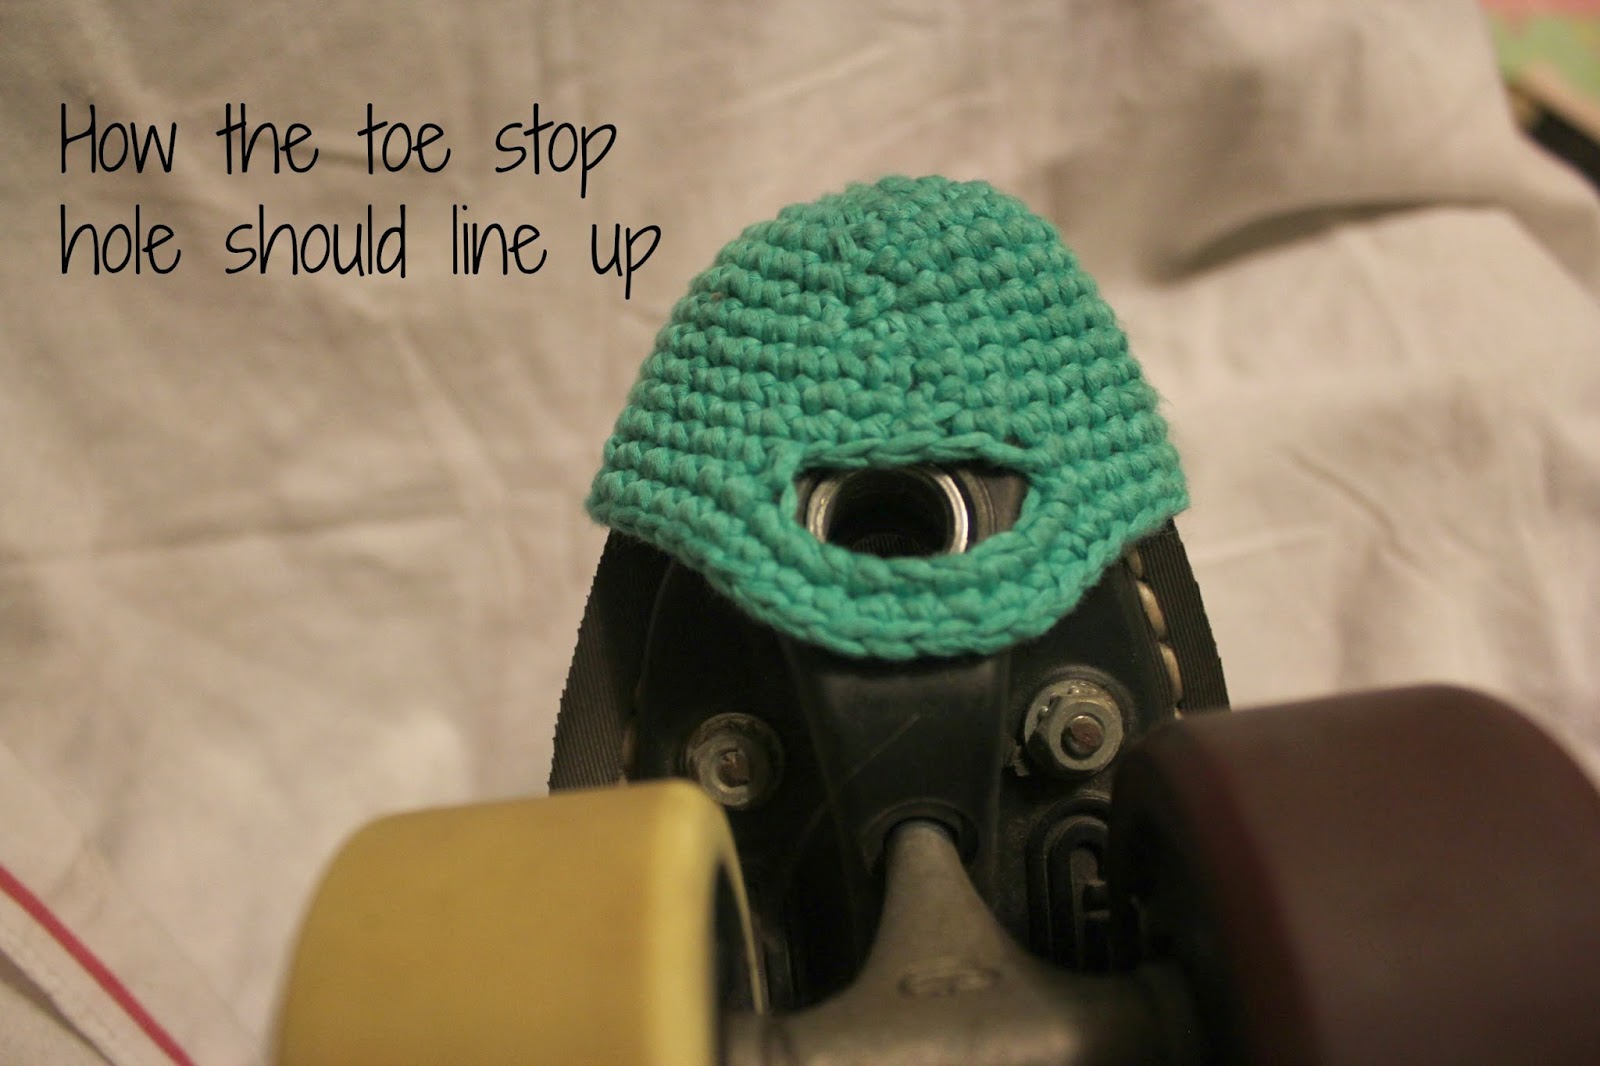
Row 11: *This is where we add the toe stop hole. Use your pattern as a guide on your skates for where the toe stop hole should start* Sc around to where you want the hole. Ch 9, skip 3 stitches, sc into the next stitch.

Row 12: Sc around, including the ch 9.

Row 13: Sc around. Add in two lots of ch 3 for the second set of lace holes. Line these up with the first set. Once you sc past the toe stop hole, sl st and tie off. Weave in ends.

 |
| Nut, toe guard, washer, nut |


Hope this helps - any questions just ask! I'd love to see a rainbow version!
Thanks for your pattern, I love it!
ReplyDeleteI made my own for my Moxi Skates - you can see them here: http://skele-kitty.deviantart.com/art/Crochet-Skate-Toe-Guard-565643740
What yarn did you use for this? I know it's 100% cotton but it doesn't look like the typical cotton yarn i am finding in the stores :)
ReplyDeleteHi thanks for the comment! This was a weird yarn I found that is made in a tube shape. Normal cotton should work fine but you could always crochet 2 strands together to make it thicker.
DeleteAbsolutely love these. I just made a pair for myself and it was a really quick and easy pattern to work with.
ReplyDeleteI know you said up there that you don't want people to sell things based on this pattern. I'm going to be really cheeky and ask how you feel about me making some to sell for my local club though? I'll take no for an answer, of course, it just seems such a perfect way to contribute.
I coud totally add a link to this page to each set in order to give you the credit if that helps any.
Hey! I'm glad they worked out for you! I'm happy for you to make them to sell at your club - I'm all for fundraising and helping out! I'd love to see photos of them too once your done. Enjoy!
DeleteThank you! I'll make sure to get you some pics. <3
DeleteThis comment has been removed by the author.
ReplyDeleteThank you so much for this pattern. I think I must have made over a dozen pairs by now - my original set for my own skates (still look amazing a year later!) and a ton of sets for gift baskets for other teams. I even made my junior a set (skipping the 2nd increase row and continuing as normal worked perfectly!). If anyone else is looking for good yarn to use - I've been using the lily sugar & cream and it's perfect.
ReplyDeleteThank you for the pattern, I tested it out with some sugar & cream yarn in the same color you used. I think maybe I will try making another pair with some thin paracord, but the cotton yarn ones work great!
ReplyDeleteThis comment has been removed by the author.
ReplyDeleteThis comment has been removed by the author.
ReplyDeleteIn this step: "Row 3: Ch 1, (2 sc in the next stitch, 1 sc in the next stitch). Repeat instructions in bracket around the circle. Sl st to join."
ReplyDeletewhen you say repeat instructions in brackets around the circle does that mean 2sc every second stitch (i.e. alternate 2 sc, 1 sc, 2 sc, 1 sc, around the circle) til the end?
Also do you have any suggestions in modifying the pattern for a smaller yarn? I have 10 ply cotton yarn which isn't as big as the yarn pictured.
DeleteThanks :)
Sorry one final question: how would you go about adding an extra increase row?
DeleteWould I follow the pattern of the brackets and (2sc in one stitch, 1 sc in the next, 1 sc in the next and 1 sc in the next) i.e. 2 sc in every fourth stitch, and repeat til the end of the row?
Nice post. I was checking continuously this weblog and I am impressed! Very useful information particularly the closing part :) I deal with such information a lot. I was seeking this particular info for a very lengthy time. Thanks and good luck.
ReplyDeleteAny pattern for knee pad covers?
ReplyDeleteCan't wait to make these. Yes knee pad covers? Elbow covers? Just a thought.
ReplyDeleteI read your article, very informative and userinformatic info are mentioned. For Villa renovation companies Dubai also look our best Villa renovation companies. Keepit up bro to share more article like that. Thanks for sharing this ones.
ReplyDelete