Wednesday, 27 March 2013

Double the Craft

Goings on lately here have been sporadic at best - April is going to be a crazy month for us - 2 weddings, a BLOGGERS CONFERENCE, and *hopefully* having our first home go unconditional!

Needless to say, my mind has been elsewhere and my poor crafty side has suffered. But out of the craziness, a couple of things happened.

1. I busted out the Sonic Granny Square Blanket again and started to work on the background. Progress is slow but I am joining as I go so I can see how much is happenning!


2. A far-away-but-still-awesome friend of mine asked if I could sew her a laptop sleeve that would protect her new mac lappy from heavy text books. I jumped right into this one and made up a prototype with some leftover fabric and batting.

I measured out a rough rectangle of fabric and quilted the front, batting and lining together with a wavy pattern. I then measured the lappy, folded up the bottom of the quilted fabric and sewed it into an envelope format. I finished off the edges with a zig-zag stitch (lazy womans overlocking) and added a button and buttonhole (by hand - my sewing maching lacks this capability). It looks like a success so I am off fabric shopping this weekend to buy some pretty chevron fabric to make her an actual sleeve!


Also, as with the rest of the crowd, I am giving Blog Lovin' a go, I hear rumours my beloved Dashboard (didn't even get as far as Google Reader!) will be thrown to the wolves too so it seems I have no choice!
You can follow On A Crafty Adventure on Blog Lovin' here. Hope to see you over there.
Those Facebook friends who have no idea what I am talking about? It's ok, I will still link my posts on Facebook.

I still have a few crafty projects up my sleeve so you will hear from me again soon - as well as my next installment of Diary of a Derby Girl!

Monday, 25 March 2013

Diary of a Derby Girl {The Nudge}


For those who missed the first installment - Read How I found out about Roller Derby

Part Two:

So a couple of years go by, in the midst of earthquakes and work and life and church, time flew by. Enter Christmas 2012. I have an amazing friend (and bridesmaid!!) who got into derby a couple of years back in Auckland and became known as Minnie Mayhem.

Check her out! I am so proud of her and she is an amazing Jammer!


Anyway we went to Auckland to spend Christmas and New Years with her and her Hubby and almost every day that we were there was spent at a skatepark or somewhere with skates on.
Although her feet are 2 sizes smaller than mine, she managed to convince me to give it a go. Well. Despite my feet being crushed, I stood up like a baby giraffe, wobbling everywhere. I pushed off and skated slowly around a pole and back. Then I fell on my bum.

Now before I go any further I would like to mention that Roller Derby cares very much about your protection. If you don't have the right safety gear, you dont get to skate. Simple. So wrist guards - check, knee pads - check, elbow pads - check, helmet - check, mouthguard - check.
UM - HELLO! Someone seems to have forgotten about the protection of one very important body part on the backside of the body (see what I did there?) You can get pants with pillows in them (essentially) but they make your rear end look a million sizes bigger than it already is. I'll pass on those thanks.

Back to the story - I got up gingerly and did a couple more laps but my pride as well as my bum was hurt. All was well later on in the week though when Ivy taught me a few tricks - like stopping - that made things a bit easier.
Also during the week Ivy was not-so-subtly hinting for me to join up with one of the leagues back home in Christchurch and give it a go. And I was being every so slowly pursuaded. I had found some old skates in my parents ceiling space and Ivy helped me pimp them with shiny new wheels that actually spun, and sent me back to Christchurch with a bunch of her old safety gear.

I was hooked and spent a couple of nights practicing on our cracked driveway (bad idea) and sent an email out to one of the local leagues to see when the next freshmeat* intake was.

A month or so later I heard back and BOOM I was committed.

Tune in for the next Diary entry coming soon!

*Freshmeat is what they call the 'initiation' and training stage of derby. Before you get to play any bouts you have to pass a skills test that is a good few pages long with all the different skills you need to safely play roller derby. You also get paid out a bit from the skaters and get made to do all the menial tasks at games. It lasts a few months and you train between one and two times a week.  Once you graduate you get drafted into a team and can scrimmage your heart out.

Wednesday, 20 March 2013

Diary of a Derby Girl {The Beginning}


Back in 2010 a group of friends and I were looking for something to do on a Saturday evening. Somehow, we ended up packed into a noisy stadium, on uncomfortable tiered bench seats, surrounded by screaming men, women and children wearing a rainbow of colours supporting their favourite team. Rugby? Far from it! We were at a Roller Derby Bout!

All I knew of the sport was that it was an all-girl game on roller skates. I hadn't seen the movie Whip-it (a must see!) or heard anything else about it. The bout (the derby term for game) was an inter-league smackdown to win the Tequila Mockingbird Cup. The teams? Cell-Block Brawlers vs Carnage Acadamy.

The players were introduced by the MC and they rolled onto the track wearing an assortment of ripped tights with short shorts or mini skirts and singlets in their teams colours. They had knee-pads, elbow-pads, wrist guards, helmets and mouthguards. Each singlet had their derby name on it and their chosen number. Names like Rogue Runner, Lawless-Mess, Yank-Tank.

There was a rundown of the game (more on that later) and the teams then lined up for their safety check. Once it was confirmed that all padding was in place the girls lined up for the first jam (derby term for a round or 2min or less). Once the whistle blew all hell broke loose. The teams were in packs trying to stop the other teams Jammer getting through and when that failed, they tried to help theirs break through.

Girls fell, they got wiped out, they performed maneouvers you wouldn't think possible. IT.WAS.AWESOME!

That night I had the time of my life and went home buzzing. It was right up my alley to join but I shrugged it off because my schedule was too jam packed with commitments. I kept following the games that season and got familiar with the rules and the action.


...Stay tuned for the next installment of Diary of a Derby Girl {The Nudge}

Wednesday, 13 March 2013

Standard Lamp Makeover Version 2.0


Remember last time I re-styled a standard lamp and I mentioned I had an idea in my head that involved red gloss paint? Well here it is. I am super excited because this project turned out almost exactly how I had it pictured in my head. That almost never happens!

I have now decided that THIS lamp will stay at home with us and the other lamp will be getting sold. This one matches our couches perfectly.

Here are some before and after pictures so you can see what a relief it is to have this lamp finished!


Haha I think that my lawn may be slightly uneven looking at these photos.

Anyway here are the details:

Lamp and Shade: Pretty sure it was around $20 from a garage sale.
Spray-paint: Super Cheap Auto's brand - around $7 per can, I used a Grey Primer and Gloss Red
Fabric: After hunting around fabric shops I found this fabric in curtain form at The Warehouse $39 for a pair and I used just less than one length. Cushions maybe?
Trim: $3.99 per metre from Lincraft. I used just shy of 6m

Surprise fact about this project:
The top 'crown' of the shade (as I like to call it) detatches completely from the main frame when it in unpicked. It sure makes it easier to recover, I'll tell you that! Plus that magic trim hides a multitude of stitches.

What do you think of the red? Is bold better?

Tuesday, 12 March 2013

Mirror Mirror on the Wall


One of my (many) projects half finished is this mirror frame. As you may remember I am the queen of brass frames and am always on the look out for things to do with them.


                      Spray-painted brass frames


 My next project is to turn these frames into mirrors.

I realised as soon as I enlisted the help of my amazing hubby, that this wouldn't be as simple as I thought. It turns out that cutting glass/mirror is more than just going at it with a saw. It requires safety goggles, a glass cutter, some sort of tapping device and a tonne of patience. None of which I have but my hubby has all of. He cut out the first one with me and when I asked if I could do the next one he said, 'you have to practice cutting straight lines first'.
BORING! I want to get this project done! But since that was the ultimatum, I have not cut straight lines and therefore not graduated to cutting curves.

Hence the project is at a standstill.

BUT, these frames are just sitting there taunting me so the next free afternoon I have I will practice my straight lines.


Wednesday, 6 March 2013

Sneak Peek

I have so many projects on the go at the moment it is hard to focus on just one and get them finished. Here is a sneak peek of my current two. I am spray painting them at the same time because I can time it so while one is drying, the other can have another coat. Smart right?

One is a tiny side table with pretty slender Queen Anne legs which will be sprayed white and distressed and destined for Trade Me.

The other I am really excited about. I have a vision for this lamp and I can't wait to go fabric shopping to match what I see in my head! The gloss red is coming up really well. Dave will be pleased to know that I have been converted to using primer. It is well worth the extra time.

Friday, 1 March 2013

Standard Lamp Makeover


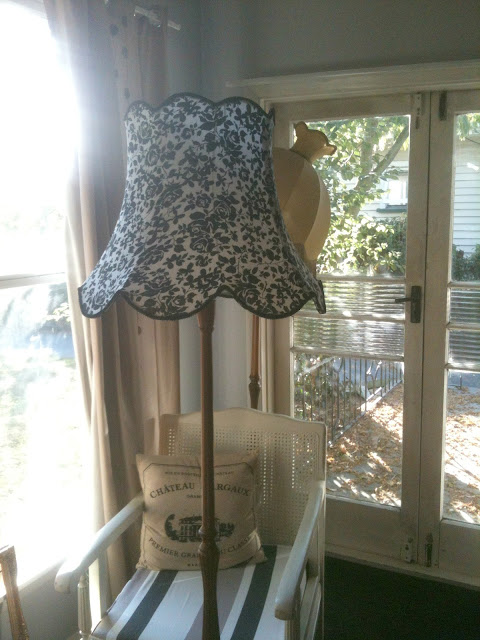
Another one of my collections involves standard lamps. It isn't huge but I am sure that it will grow, I just can't help myself. I own 3 so far, I have now re-covered two of them and I have big plans for the third. It involves the colour red.

Another thing I have to mention is why are before photos so terrible! (well mine usually are anyway) I think it is because by the time I remember to take a photo I am already in the zone of deconstructing - usually late at night - and who wants to ruin that zone! Well, that's my excuse anyway.

I had the fabric for this project lying around for about 2.5 years but it was disguised as a tablecloth and I had totally forgotten about it. I did a quick visual estimate and determined that I had enough material to tackle this project and I was away laughing.

I used some black trim on the top and bottom of the lampshade - inside and out and I used a total of 5.5m (I bought 6 - good guessing!)


Primer (at Dave's insistance)

First coat of black
The shade with the old wooden base

Let there be light!

The pretty turned base. I used matt paint but put a coat of clear gloss so it looks quite flat. I like it.


What do you think? Would this old piece fit in a modern room now? 
Would it be put in a corner or would it be pride of place somewhere?